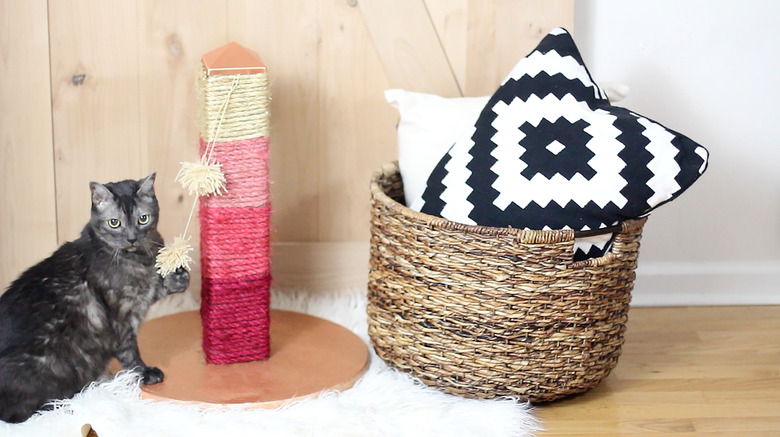
Make A Cat Scratch Post That's Actually Not Ugly
We may receive a commission on purchases made from links.
Cuteness may earn compensation through affiliate links in this article.
 Trisha Sprouse
One of the most common complaints that vets hear is that their cat's scratching is destroying furniture, door frames, carpeting, and other household furnishings. Cat scratching behavior is entirely normal — and healthy —but it's entirely possible to target it to attractive scratching posts that you can easily make yourself.
Discover kitty's scratching preferences
Discover kitty's scratching preferences
All cats have preferred surfaces and reasons for scratching, and it's important to understand your cat's mindset on the subject before delving into making a scratching post. Scratching leaves scent marks that help a cat define its territory, so entrances to rooms — especially door frames — are common targets.
Cats also like to stretch after a nap, so placing a scratching post near favorite nap spots is key. Multi-cat households should have multiple scratching posts. Learning to make your own is one way to be able to effectively provide as many posts as your cats need — with a decorative flair that compliments each location.
Cats are all about the texture and the satisfaction they get from digging their claws into the material. Most cats prefer a rough material that provides a shredding sensation against their claws, according to Ohio State University's College of Veterinary Medicine Indoor Initiative. Sisal rope fits the bill for most cats, stands up to repeated use, and is easy to work with for humans building the posts.
Get the rope
Get the rope
There are various sizes of sisal rope available in big box hardware stores or online. Most cat scratching posts use 3/8" (10 mm) or 1/4" (6 mm) diameters. The 3/8" is more durable to cat claws and allows cat claws to penetrate more deeply; however, 1/4" is more flexible and can be easier to work with if this is your first project.
How much you will need depends on what width you buy and the length of the base post. The post should be as tall as your cat when it is fully stretched out when it's standing on its back legs to its full height, usually about 3 feet. This lets your cat completely flex and stretch at all its body positions, so it won't have to go looking for taller things to scratch on.
Measure the circumference of your post. A 4"x4" post would have a circumference of 16 inches. Use the What Kitty Wants Sisal Rope Calculator to determine how much sisal rope you need. Subtract an inch to allow for the placement of the top cap.
For example, covering a 3-foot 4x4 post completely in sisal rope would require 128 inches of 3/8" rope or 192 inches of rope if you covered it from end to end. However, by subtracting an inch, you'd only need 125 feet of 3/8" or 187 feet of 1/4" sisal.
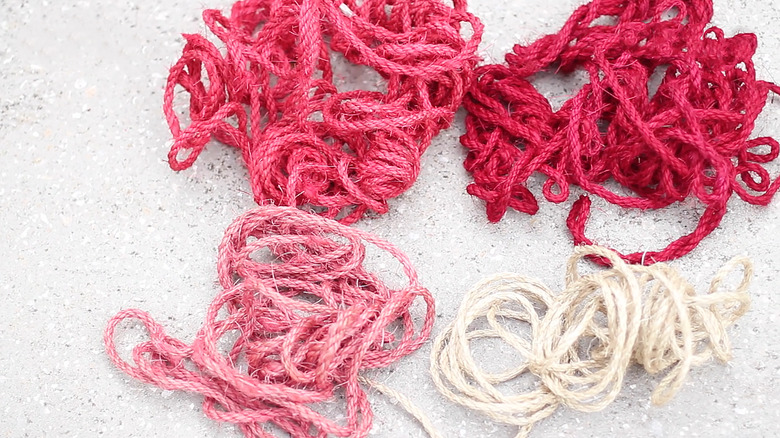
Buy light-colored sisal rope such as Yangbaga Natural Sisal Rope if you intend to dye it, like the project featured in the photos. Or select pet-safe dyed rope such as CAThrone Sisal Rope for Cat Scratcher Repair. Do not buy oiled rope, which is usually a dark brown color, as the oil treatment is not pet-safe.
Other things you'll need
Materials for your post
- 4x4 fence post cap – Vinyl caps such as Jake Sales 4" Vinyl Post Cap are the least expensive, but if you want to get fancier, check out this HLC 4x4 Post Point Cap in Solid Copper. To win your cat's heart, choose a cap with a flat surface like Deckorators 72213 Newport Classic Treated Post Cap so she can perch comfortably on top of the unit.
- RIT dye or other non-toxic pet-safe fabric dye in two colors
- 18-inch plywood circle – Woodcrafter 3/4" Thick Baltic Birch Plywood Circle 18 Inch. Make sure your plywood is not thinner than 3/4" or it won't provide the stability needed for your cat's rough-housing.
- Optional: Pom-poms, balls or refillable catnip toys to dangle from the post. Catnip spray like Smokey's Stash is also a good way to make your cat's new scratching post appealing to her.
Gather other equipment you'll need to create and assemble your post, including a dyeing container such as a bucket, carpenter square, marker or carpenter's pencil, several rubber bands, 1200-grit sandpaper, a drill, 16 half-inch roofing nails, and four 3-inch wood screws.
Dye the Rope
Dye the Rope
Pick your color palette for the project. For the project featured in the photos, three color variations were created from two shades of Rit dye: petal pink and fuchsia. Natural sisal was used for the fourth color. Learn to perfectly match colors to your decor and preferences by using the color mixing charts found in Rit's Color Formula Guide.
 Trisha Sprouse
Divide the rope into sections according to how many colors you plan to have on your cat scratching post. When cutting the rope, fold an inch or two back on itself and secure with a rubber band. This prevents the rope from unraveling during handling.
Follow the instructions on the bottle for natural fibers to prepare and dye the rope. When each dye bath is finished, rinse the rope thoroughly until the water runs clear. Let dry completely — about 24 hours, before attaching the rope to your cat scratching post.
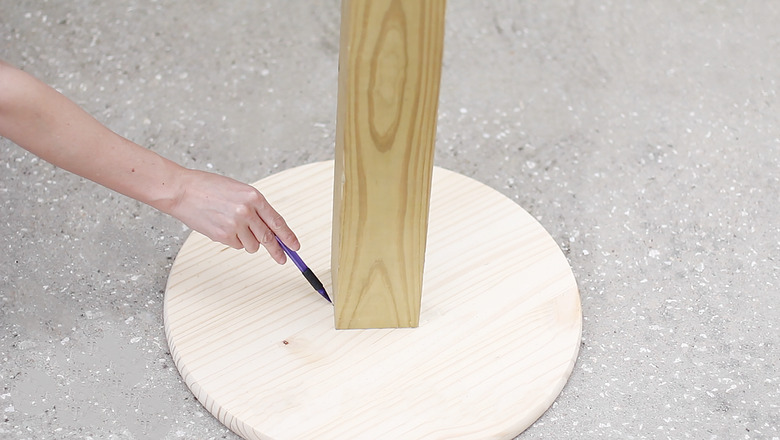
Prepare the base
Prepare the base
Flip the wooden base upside down so that the side that will eventually face the floor is up. Use a measuring square to find the center of your circle. This entails drawing a perfect square as large as possible inside the circular stand, then drawing diagonal lines to connect each of the corners. The lines will intersect in the center of the circle. For detailed instructions, watch Tomahawk DIY's instructional video.
 Trisha Sprouse
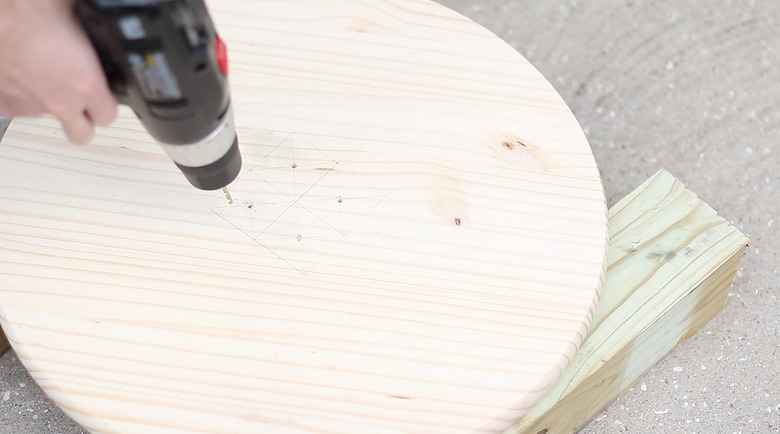
Place the post upright in the center of the circular base, aligning each corner along one of the lines you drew to find the circle's center. Use your marker to trace around its base. You now have four smaller squares in the center of your circle.
Use your marker and a straight edge to connect the corners of each of these small squares to find their center. Drill a pilot hole in each of these center points. Then flip the base right side up.
 Trisha Sprouse
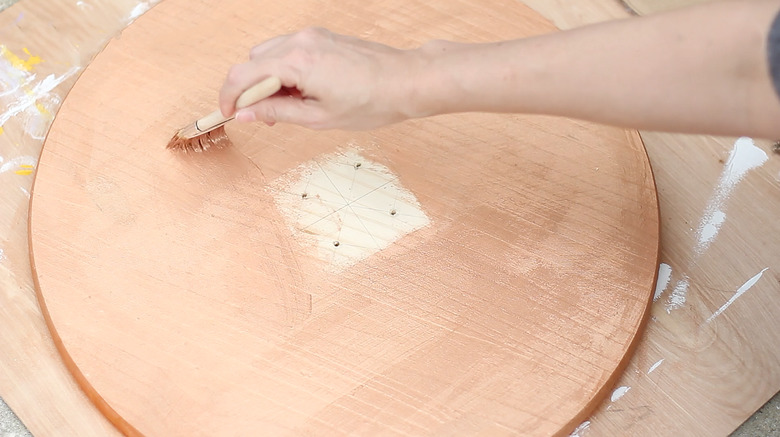
If you want natural unfinished birch as your base, lightly sand and skip any further finishing. Otherwise use a non-toxic, no odor, zero VOC product that is safe for pets. Acrylic paint is non-toxic to pets and the Cuteness project photos used a shade of copper/rose gold.
 Trisha Sprouse
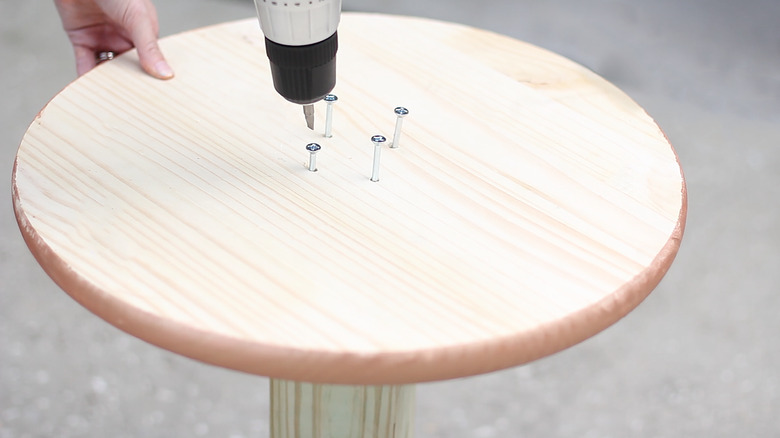
When the base is thoroughly dry, attach the fence post to the wooden circle with the 3-inch screws drilled through the pilot holes. flip both pieces upside down to drill the screws into the pilot holes and secure the post to the base.
 Trisha Sprouse
Attach the Rope
Attach the Rope
Select one color of rope to start wrapping at the base. Secure it with three or four roofing nails, advises Cats International, and wrap the rope tightly around the post, making sure there aren't any spaces between the rows of rope. Although it might seem natural to glue the rope down using hot glue, only a tight wrap will stand up to your cat's strong tugging; the glue will quickly let go and leave gaps.
Start and finish each length of sisal rope by securing it with nails. Remember to leave an inch of space at the top to apply the finishing cap.
 Trisha Sprouse
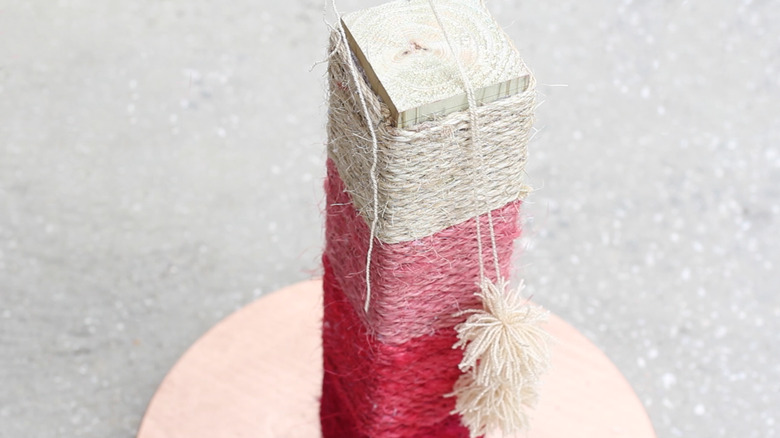
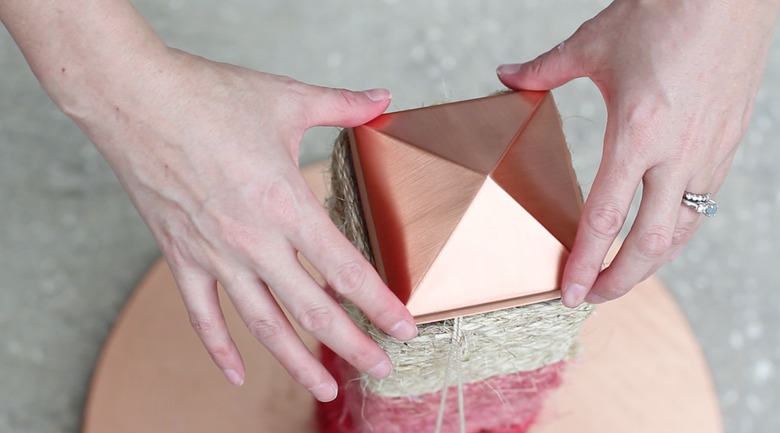
If you want to dangle pom-poms, catnip balls, or other enticements from the post, secure them by a length of twine to the top of the post. Then crown your creation with the decorative cap, secure it to the post per the manufacturer's instructions.
 Trisha Sprouse